Registration Walkthrough: Desktop
Getting Started
Before you can register for courses, you will need a Regent Login. This will give you access to our online registration system. If you don't have one yet, follow these instructions to request a Regent Login. Return to this page after you've submitted the online request form and received an email with your login information.
Note: The screenshots below depict registration for Summer 2026, but you can follow the same process for any term that is open for registration.
Step 1: Log In to REGIS
Go to REGIS by clicking the link or typing regis.regent-college.edu into your browser. Enter your Regent Login information.
Note: If you can't remember your login information, try following these recovery instructions.
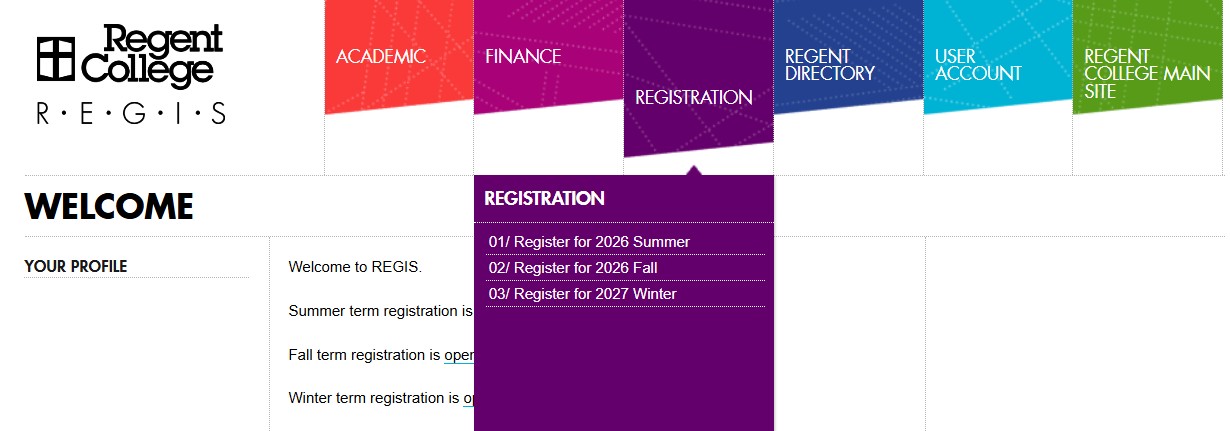
Step 2: Navigate to Registration
Move your mouse to the REGISTRATION tab at the top of the page. A list of options will appear.
Select the term for which you wish to register.
Step 3: Read Registration Info
Read through the information on the registration page and decide whether you want to register to study onsite or online. Note that even if your course is offered both onsite and online, you must decide at this point whether you will take it as an onsite or online student. If you change your mind, you will have to drop the class and re-register before the add/drop deadline.

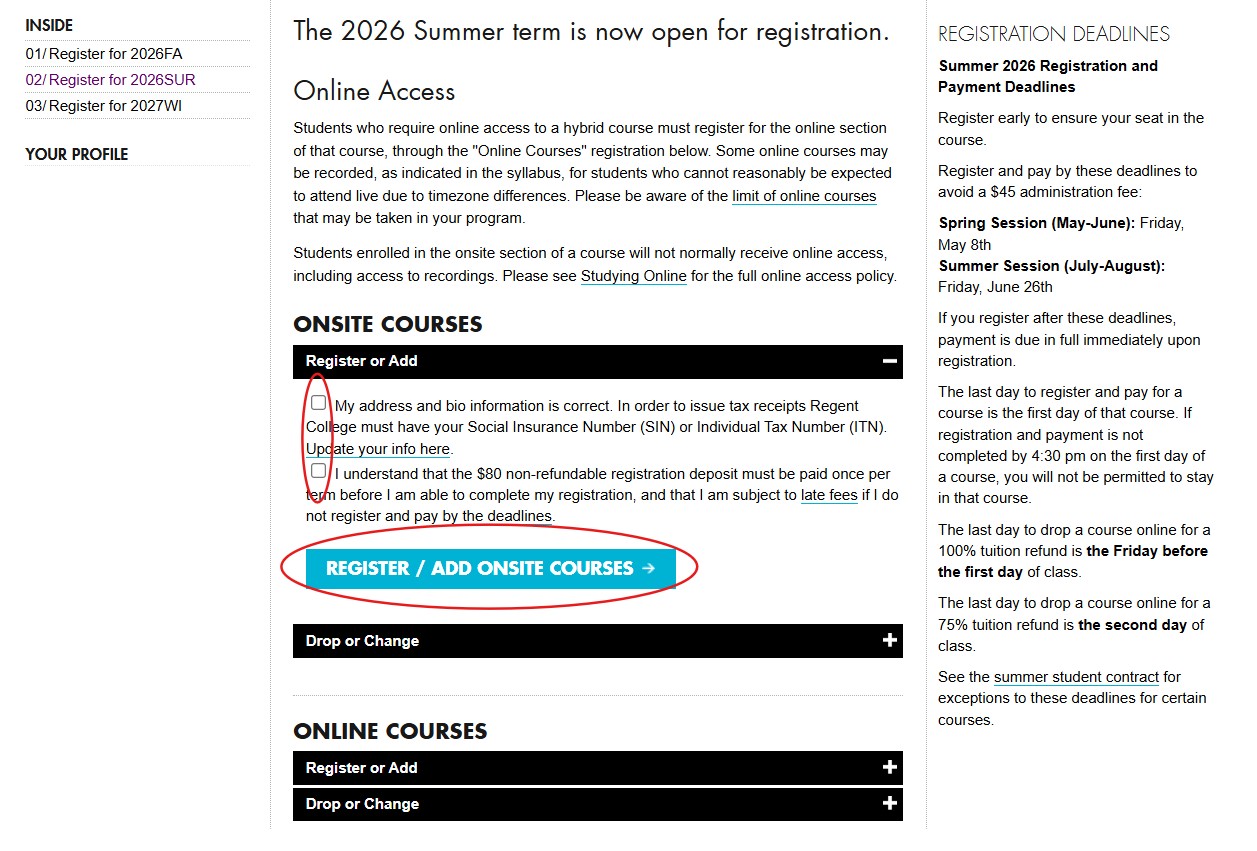
Step 4: Begin the Registration Process
At this point, you will enter the process to register for either onsite courses or online courses. Many students get confused at this point, so make sure you click "Register or Add" under the correct heading!
- ONSITE COURSES: Register here if you plan to attend a course in person. Under most circumstances, you will not be able to access the course online. See Step 4A below.
- ONLINE COURSES: Register here if you plan to attend the course online from a distance (i.e., not in the physical classroom). See Step 4B below.
Note: If you plan to take a combination of onsite and online courses during the term, you'll need to go decide which type to do first. When you're done, return to this point to add the other type.
Step 4A: Register for Onsite Courses
- Directly underneath the ONSITE COURSES heading, click "Register or Add" to expand the section.
- Read the statements and check the boxes if you agree. (Follow the links in the text if you need to update your information or learn more about payments and deadlines.)
- Click the button: REGISTER / ADD ONLINE COURSES.
 This student is getting ready to study on campus at Regent.
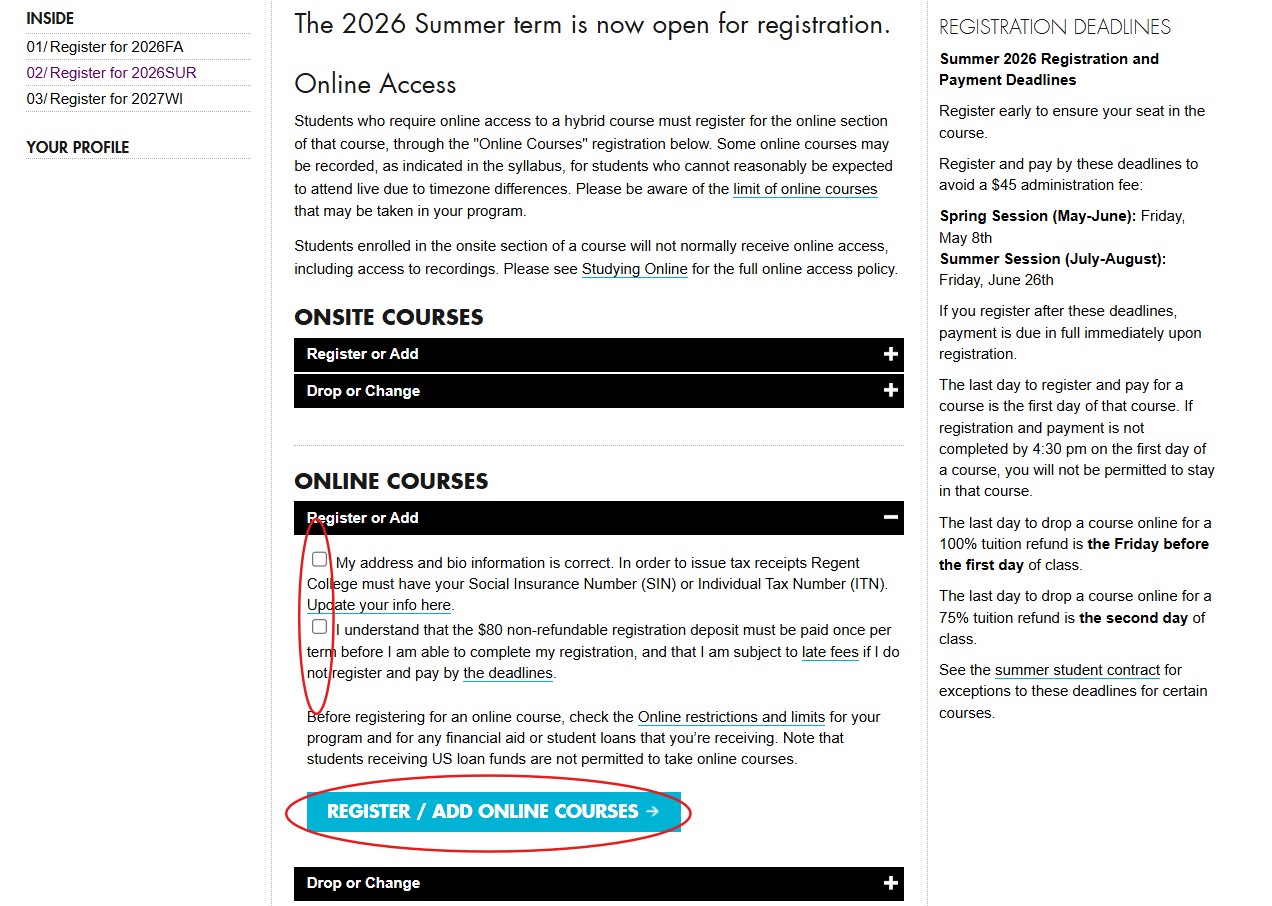
Step 4B: Register for Online Courses
- Directly underneath the ONLINE COURSES heading, click "Register or Add" to expand the section.
- Read the statements and check the boxes if you agree. (Follow the links in the text if you need to update your information or learn more about payments and deadlines.)
- Click the button: REGISTER / ADD ONSITE COURSES.
 This student is registering to study from a distance.
Step 5: Read the Student Contract
Read the Student Contract carefully and thoroughly. It contains important information about:
- Important deadlines for registration, payment, dropped course refunds, etc.
- Academic and community life policies
- Tuition and fees (amounts, eligibility, payment methods, etc.)
If you agree to the terms, click AGREE AND CONTINUE at the bottom of the page.
Note: Each term has its own Student Contract, and details change from term to term and year to year. Be sure to read this term's contract closely, even if you've studied at Regent recently.
Step 6: Find Your Course
After agreeing to the Student Contract, you'll enter the registration process. On this screen, you'll see all the courses available for the term and registration type (onsite or online) you selected.
If you know which course you're looking for, you can search by its course number, title, or instructor(s).
Note: The following screenshots show a student registering for onsite courses, but the process is the same for online courses. If you're not sure which type of courses you're looking at, check the subheading and notification at the top of each page.
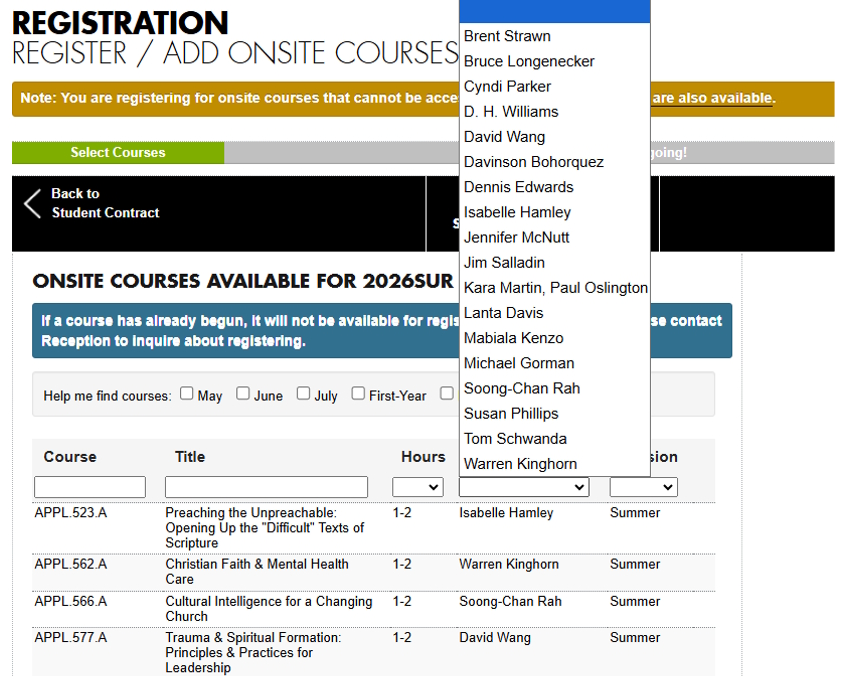 This student is going to filter the course list by instructor.
Step 7: Select a Course
Choose one course at a time from the list.
- To see a brief preview, hover your mouse over the name of a course.
- To see a full description and other course information, click on the course.
- To select a course, click one of the options next to REGISTER FOR CREDIT or REGISTER FOR AUDIT. (Learn more about these options on our Ways to Study page.)
 Two-credit students complete more coursework. Audit students skip assignments completely!
Step 8: Return to Course List
After selecting to take a course for credit or audit, you will be returned to the course list. A green banner with details about your selection will appear at the top of the list, and the word "Selected" will appear next to the course.
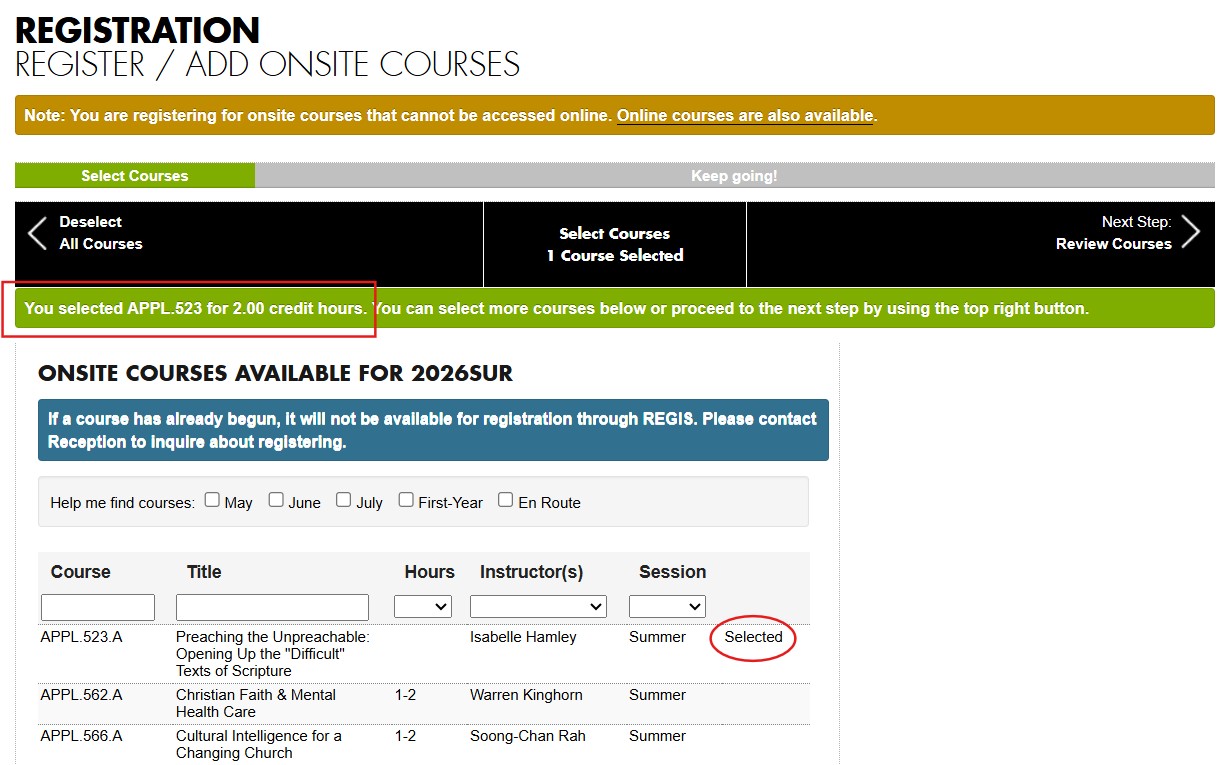 This student plans to take Preaching the Unpreachable with Isabelle Hamley.
Step 9: Select More Courses
To select additional courses, repeat Steps 7 and 8.
Step 10: Finish Selecting Courses
When you are finished selecting courses, click "Next Step: Review Courses" near the top right of the screen.
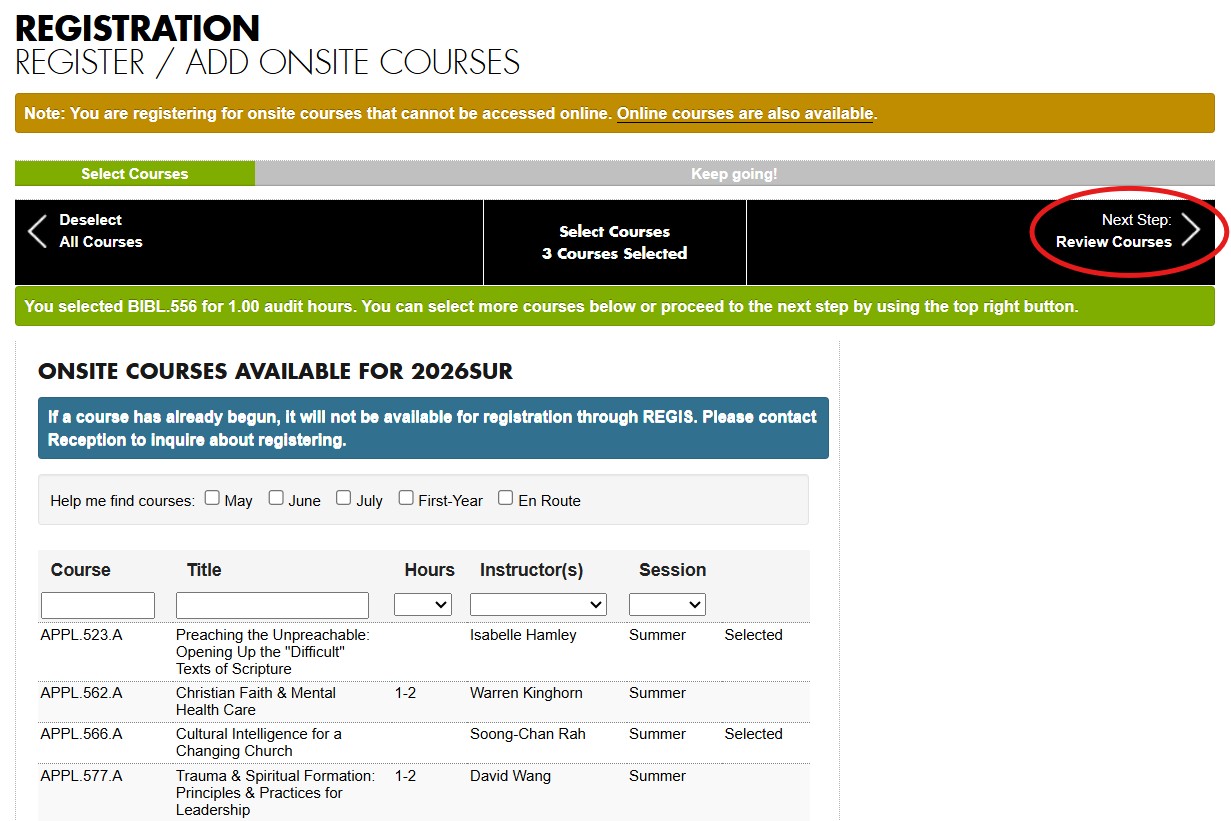 This student has selected a third course and is ready to review her choices.
Step 11: Review Selected Courses
This screen presents a summary of changes to your registration. Make sure that the details of your selected courses, including the number of hours you want (CR for credit or AU for audit), are correct. REGIS will list the tuition you'll owe for each course, as well as the Registration Fee and any other charges.
If everything is correct, click CONTINUE.
If you notice a mistake, click "Previous | Select Courses" (black button toward the top left of your screen). This will return you to the previous page. Open the course with the mistake, and click UNSELECT. You can then add a different course or the same course with different credit/audit hours.
 This student is registering for three onsite courses.
Step 12: Pay Registration Fee & Tuition Deposit
Before finalizing your registration, you need to make an initial payment. REGIS calls this a "Registration Deposit," but it actually consists of two parts:
- A non-refundable Registration Fee
- A Tuition Deposit, which is applied toward your tuition for the term. (Note: This amount is lower for Summer term than for Fall and Winter.)
In the payment form, REGIS will auto-fill the address in your Regent profile. If this is different from the address associated with your selected payment method, you will need to update the address on the form. If the address submitted does not match your card, the payment will not be processed.
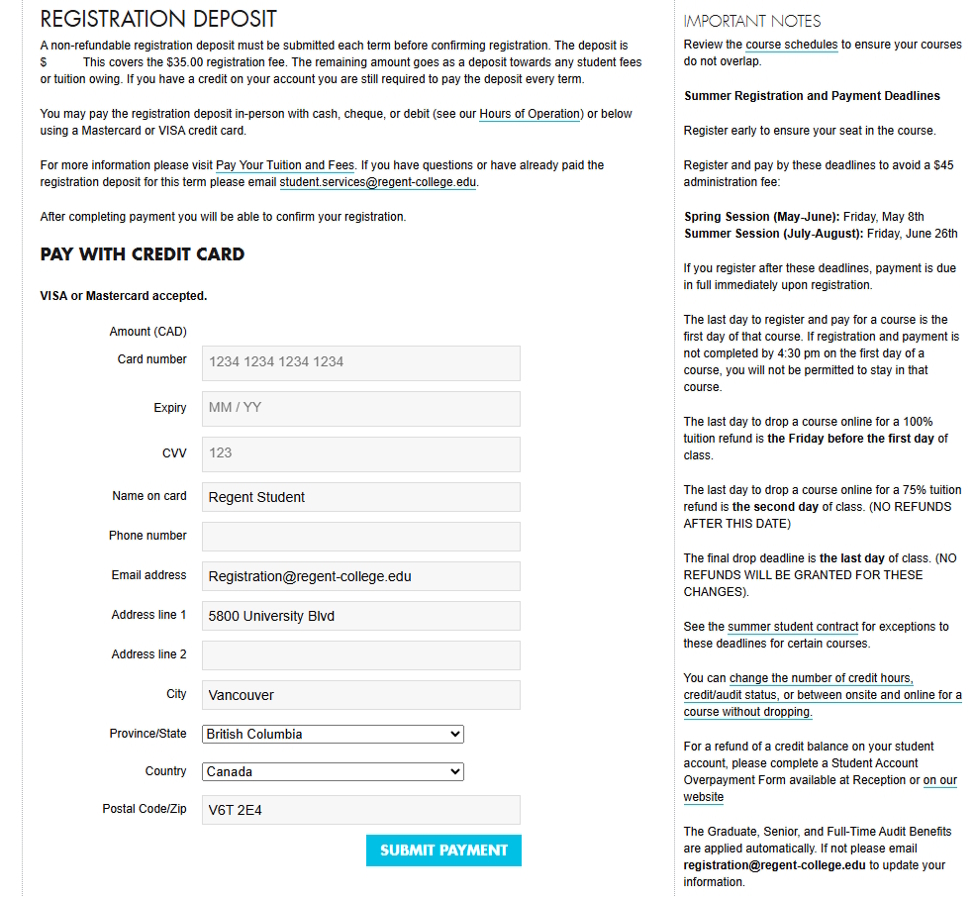 This student owes a $35 registration fee and a $45 Summer tuition deposit.
Step 13: Submit Your Registration
Don't stop now: you're not quite finished! (This is a common mistake.)
After submitting your payment, you'll be taken back to the review screen. Check for a green banner indicating that your payment has been received.
At the bottom of the page, click SUBMIT REGISTRATION.
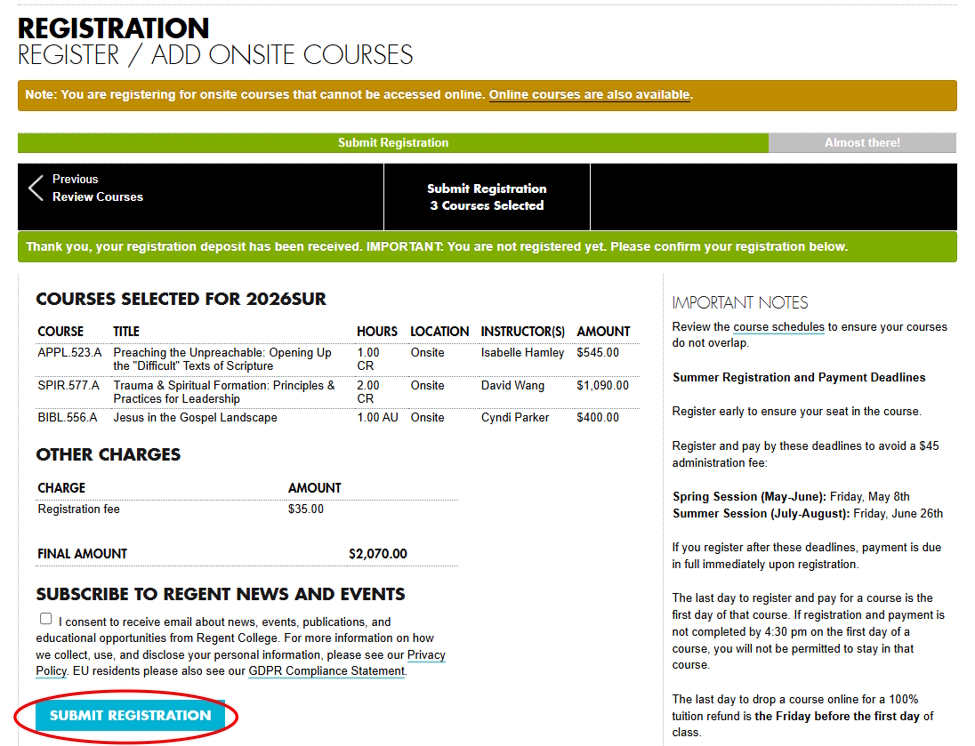 Don't forget this step.
Step 14: Confirmation Page
If you see this REGISTRATION SUBMITTED message, you've successfully registered.

Step 15: Confirmation Email
You should also receive a confirmation email at the address listed in your REGIS account.
Questions?
If you have questions about the registration process, please don't hesitate to get in touch with our Registration Officer at [email protected]. We're happy to help!
-

- Courses
- Registration
- Registration Guides
- Registration Walkthrough: Desktop
-
- Courses
- Registration
- Registration Guides
- Registration Walkthrough: Desktop